How to setup CNAME
The CNAME feature lets you generate video embed codes using your own custom domain. Follow the steps below to set up CNAME with KillerPlayer.
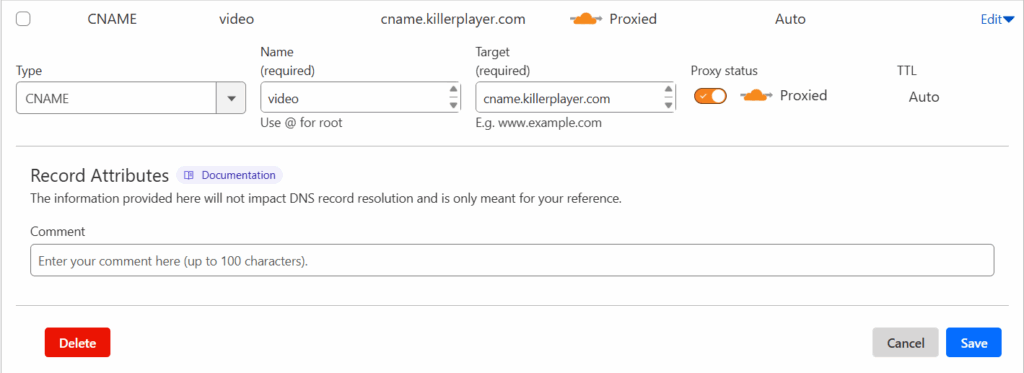
1- Add your domain to Cloudflare, then navigate to the DNS settings of your domain to add a new CNAME record.
| Field | Value |
| Type | CNAME |
| Name | video (or any subdomain you want) |
| Target | cname.killerplayer.com |
| TTL | Auto |
| Proxy | ✅ Enabled (orange cloud) |
It should look like this:
2- Now login to your KillerPlayer account and visit My Videos page.
3- Enter your subdomain (e.g., video.yourdomain.com) in the CNAME field, replacing yourdomain.com with your actual domain name, then click Save.

4- Wait for DNS Propagation: DNS changes can take a few minutes up to 24 hours to fully propagate. Usually, it’s done in 5–10 minutes.
5- 🎉 Congrats! All your existing video links will now automatically use your subdomain; no need to re-add anything. Plus, all new video links will be generated with your subdomain by default. KillerPlayer will automatically serve your subdomain over HTTPS once it's connected; no additional SSL certificate needed on your end.
You can only add one domain in the CNAME field.
What to Do If You Can’t Switch Your Domain's DNS to Cloudflare?
If you prefer not to connect your main domain (e.g., shrink.com) to Cloudflare, there’s a flexible alternative: use a secondary domain specifically for the CNAME setup. This allows you to keep your primary domain untouched while still enabling full functionality.
Consider registering a similar domain with a different TLD; for instance, shrink.net or something along those lines. Once registered, add it to Cloudflare and follow the steps outlined above.
Since KillerPlayer allows only one CNAME domain per account; it’s a smart strategy to choose a domain name that works well across all your websites where you plan to embed videos. This ensures consistency and flexibility, no matter which site your videos appear on.